|
|
|
|
| Apache Tuscany > Home > SCA Overview > SCA Java > Java SCA Documentation Menu > Import existing Tuscany SCA projects into Eclipse | User List | Dev List | Issue Tracker |
|
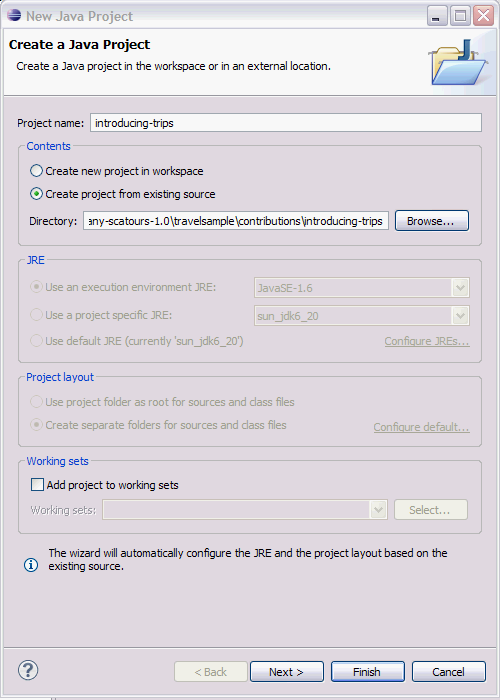
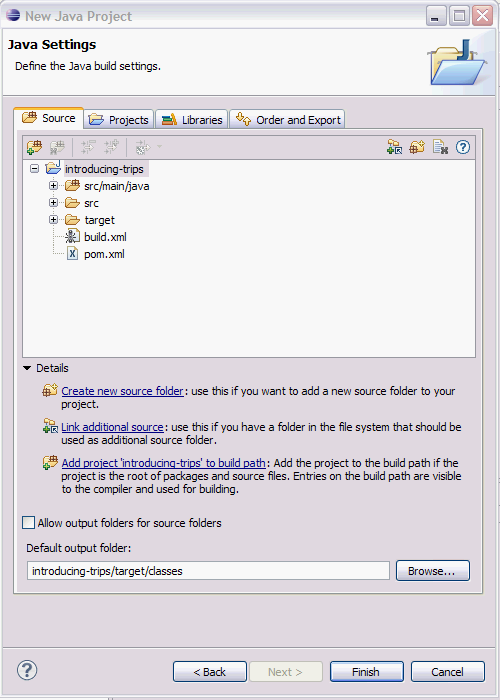
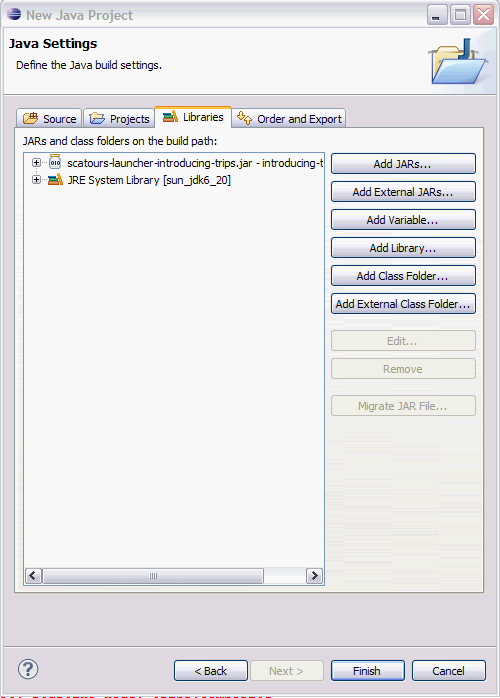
There is already a page that describes how to get started with Eclipse by building a new Tuscany SCA project from scratch. How do you though use the various existing samples and examples that are provided with Tuscany from within Eclipse? Here we'll provide some instructions about how to do just that for both the Maven user and the non-Maven user. As an example we'll look specifically at how to import the introducing-trips contributions and the jumpstart launcher that runs it from the Tuscany SCA Travel Sample. We'll also explain how to use the same approach to import other samples such as the samples in the Tuscany SCA Java binary distribution and the complete travel sample code. These instructions assume that the sample code being loaded into Eclipse has been downloaded and unzipped and the sample modules have already been compiled using Maven or Ant following the instructions in the sample's README. This is important because some of the source in sample modules is generated during the compile stage and you'll need to import that into Eclipse along with the other source code and resources that the sample modules contain. These instructions were written using Eclipse 3.5.2. Both of the approaches described below import the sample modules into Eclipse without copying them. This means that any edits to the sample resources that you make in Eclipse will result in changes in the directories where you unzipped the sample, and you won't see copies of these projects appear in the Eclipse workspace directory on disc. This is generally a useful approach as it lets you work directly on projects outside of the Eclipse workspace. In the case of the travel sample it's particularly important because there are some cross references between the various modules in the sample. If you copy the projects out of the sample structure they won't run properly without further editing. 1 - For the Maven user1.1 - Creating Eclipse project filesMaven has a plugin which will convert a Maven project into an Eclipse project. For example, to load the travel sample's introducing-trips contribution into Eclipse as a project first do the following: cd travelsample/contributions/introducing-trips mvn eclipse:eclipse That generates, amongst other things, .classpath and .project files into the introducing-trips directory. These files effectively make the introducing-trips module an Eclipse project that can be loaded directly into Eclipse. This Eclipse project will reference dependencies in the local Maven repository, based on the contents of the pom.xml file. These dependency references are constructed using an Eclipse classpath variable called M2_REPO. The previous example shows how to run a mvn command to create a single Eclipse project. It's often useful to run a single mvn command from a top-level directory to create multiple Eclipse projects. For example, to create Eclipse projects for all the samples in the Tuscany SCA Java 1.6.1 (or later 1.x) binary distribution, you can do the following: cd samples mvn eclipse:eclipse This runs the mvn eclipse:eclipse command for all the samples under the top-level samples directory. As well as being more convenient than running a mvn eclipse:eclipse command for each sample, using a single mvn eclipse:eclipse command from a top-level directory enables the Maven plugin to discover any dependency relationships between the samples and create corresponding dependency relationships between the generated Eclipse projects. You can do this for the complete travel sample by doing the following: cd travelsample mvn eclipse:eclipse 1.2 - Setting the M2_REPO variableBefore loading the project into Eclipse you need to set M2_REPO as a classpath variable in your workspace to tell it where the Maven repository is. You can do this with Maven using the following command. mvn -Declipse.workspace=<path-to-eclipse-workspace> eclipse:add-maven-repo Alternatively you can do it manually by opening the Eclipse workspace you’re going to use and then: Select Window/Preferences 1.3 - Loading an existing project into EclipseOnce M2_REPO is set you can load the project(s) into Eclipse by opening the Eclipse workspace you’re going to use and then: Select menu File/Import… For example, to load the contributions/introducing-trips project from the travel sample, you would select the travelsample/contributions/introducing-trips directory. To load all the Tuscany binary distribution samples you would select the samples directory, and to load the complete travel sample you would select the travelsample directory. The project should now appear in your workspace. 1.4 - Running the sampleNow you have introducing-trips loaded you can repeat the process for the travel sample launchers/jumpstart module. Repeat step 1.1 for launchers/jumpstart and then load it into Eclipse with step 1.3. You don't need to repeat step 1.2 as M2_REPO will remain set. Now open up the scatours-launcher-jumpstart project in Eclipse (the project name comes from the Maven module name specified in the pom.xml file) and look for the JumpstartLauncher.java file. If you right click on that file and select Run As Application the sample should run. Alternatively you can select Debug As Application if you want to set debugging breakpoints. You can run other samples by finding the main class and selecting Run As Application. 2 - For the non-Maven userMaven gives a fair bit of help in creating Eclipse projects from existing project. Most of the effort is involved in working out what the dependencies are. To import projects without using Maven you first need to make all of the Tuscany libraries available to the SCA projects you'll be loading into Eclipse. You can do this by creating a TUSCANY library variable. Once you have this set you can create new projects, load existing resources into them and associate them with the TUSCANY variable so that all the dependencies are satisfied. 2.1 - Install the Tuscany distributionFollow the steps detailing in the "Install the Tuscany distribution" section of the page that discussed how to get started with Eclipse. For the travel sample you'll need to install the 1.6 (or later 1.x) release of the Tuscany SCA Java runtime. 2.2 - Setup Eclipse for TuscanyFollow the steps detailing in the "Setup Eclipse for Tuscany" section of the page that discussed how to get started with Eclipse. For the travel sample you'll need to install the 1.6 (or later 1.x) release of the Tuscany SCA Java runtime. It's at this stage that the TUSCANY library variable gets set. 2.3 - Create a Java project to contain the SCA artifactsSelect File/New/Java Project to open the "Create a Java Project" dialog and the give the project a sensible name. Note that the "Create project from existing source" option is selected and the location of the introducing-trips project has been specified. Now press the "Next >" button 2.4 - Import the SCA artifactsThe next panel allows you to set up the structure of the new project. The source tab allows you to determine where the source code and other resources can be found. 2.5 - Specifying dependency projectsThe Projects tab allows you to specify which other projects this project depends on. Some of the travel sample modules rely on other other modules, for example, the contributions/common module. However this is not the case here so you can just leave this tab with the default setting. 2.6 - Specifying other dependenciesThe Libraries tab allows you to specify the Tuscany jars that are required to compile this module.
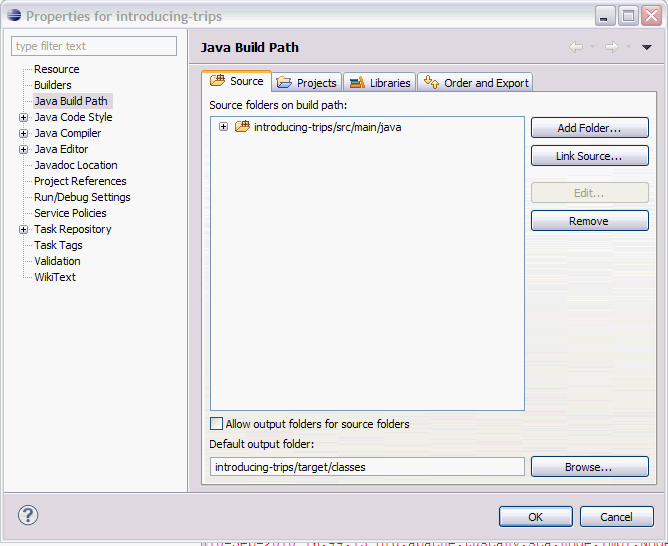
You've already configured the TUSCANY library in step 2.2 so you can select this using the Add Library button an selecting User Library in the resulting dialog. Once that's done you can press the Finish button at the bottom of the dialog. The result should be an introducing-trips project. 2.7 - Adding extra source foldersEclipse doesn't automatically pick up some of the folders that have been configured in the Maven modules. These are usually: src/main/resources src/test/resources target/jaxws-source You need to configure these manually as source directories. Right click on the project and select "Properties" options.
Now press the "Add Folder" button and select the project folder that you want to include as a source folder, in this case src/main/resources. Press OK to return. 2.8 - Running the sampleTo run the sample you need to import launchers/jumpstart by repeating steps 2.3, 2.4, 2.5, 2.6 and 2.7 for the jumpstart project. There is extra work required at step 2.6 this time though. The jumpstart module has unit tests that depend on the junit-4.5.jar that ships in the tuscany-scatours-1.0\lib\junit directory. Add this as a dependency of the project using the "Add External Jars..." button. Once done you should have a jumpstart project that compiles without errors. Now open up the scatours-launcher-jumpstart project in Eclipse (the project name comes from the Maven module name specified in the pom.xml file) and look for the JumpstartLauncher.java file. If you right click on that file and select Run As Application the sample should run. 3 - Using the Maven plugin for Eclipse3.1 - Install the m2eclipse plugin into Eclipsem2eclipse offers integration of Maven with the Eclipse platform. It provides two plugins which give you different levels of integration:
In order to install the plugins, open Eclipse and go to Help -> Install New Software.... In the newly opened window click Add... from the Work with area and enter the following update sites:
Continue installation by selecting which modules to install and accepting terms of agreement. m2eclipse uses an embedded installation of Maven by default. This can be changed with a specific instance of Maven found on the disk by entering the Windows -> Preferences menu in Eclipse. Click the Maven section and all the Maven integration related options will be displayed. In the Installations category, changes can be performed regarding the Maven instance and configuration file to use. 3.2 - Import the SCA artifactsGo to File -> Import... in the Eclipse menu. From the Maven category, choose Existing Maven Projects and click Next. In the next step, choose a root directory and the plugin will show you all the Maven projects inside it and it's subdirectories. Choose one of them and click Next. From here on, m2eclipse will take care of resolving the dependencies, generating the Eclipse specific files. Notice the project icon containing an M in the top left corner indicating the Maven nature of the project. To disable the Maven nature of a project, right click on the project, go to the Maven context menu and click Disable Dependency Management. 3.3 - Running SCA contributions and webappsOnce imported, Maven projects can be run in Eclipse using the well-known context menu Run As and choosing the appropriate category. Also, Maven related tasks (goals like compile, test, package, install, etc.) can be run by using the project context menu and going to the Maven sub-menu. Web applications can also be run from inside the Servers view as the m2eclipse extras plugin provides integration with Eclipse WTP. This enables Eclipse to recognize web applications managed by Maven. To add an application to a server, right click the server in the Servers view and go to Add and Remove.... Select which apps to publish to a particular server. Managing server state (starting, stopping, restarting, starting in debug mode) can be done using the provided buttons in the Servers view. Source code or resource changes are automatically synchronized with the published version on the server. The view also indicates if the application server needs to be restarted in order to apply major changes. |